The Ultimate Guide to Embroidery Pattern Transfer: Techniques for Beginners
Transferring embroidery patterns to fabric is the first step that turns a blank piece of cloth into a canvas for your creativity. For beginners, mastering embroidery pattern transfer methods can feel overwhelming—but with the right techniques, it becomes simple, even enjoyable. This guide breaks down every essential method, so you’ll know exactly how to transfer embroidery designs to fabric, no matter your project or material.
Why the Right Transfer Method Matters
Imagine stitching for hours, only to realize your design is reversed, or the lines won’t wash out—frustrating, right? The best embroidery transfer techniques act like a clear map for your needle, ensuring your stitches stay precise and your fabric stays clean. For beginners, choosing the wrong method can lead to smudges, stains, or designs that vanish mid-project. Let’s avoid that.
1. Water-Soluble & Air-Soluble Pens: The Beginner’s Go-To
Water-soluble embroidery pens and air-soluble markers for embroidery are perfect for those just starting out. Here’s how they work: print your pattern, then trace directly onto fabric with the pen. Water-soluble ink rinses away with a quick soak; air-soluble ink fades on its own (usually in 24–72 hours).

- Always test on a fabric scrap first—some inks stain synthetics.
- Air-soluble markers are temporary, so use them for projects you can finish quickly.
- Avoid oily fingers—oil can “set” the ink, making it hard to remove.
2. Iron-On Embroidery Transfers: Crisp Lines for Sturdy Fabrics
Iron-on embroidery transfers create sharp, smudge-proof lines—perfect for projects like tote bags or tea towels. The process is straightforward: trace your design backwards onto paper with an iron-on pen, then iron the paper (ink-side down) onto fabric. The heat transfers the ink.

- Mirror your design! Forgetting this step results in a reversed final piece.
- Test heat settings—high heat can melt synthetics or scorch cotton.
- Works best on light, tightly woven fabrics like quilting cotton.
3. Embroidery Carbon Paper: Dark & Thick Fabric Hero
If you’re working with denim, velvet, or wool, embroidery carbon paper (also called dressmaker’s carbon for embroidery) is your solution. It’s the best way to transfer embroidery patterns to dark fabric.
How it works: Sandwich the carbon paper (color-side down) between your pattern and fabric. Trace lines with a stylus—pressure transfers the pigment.

- Use embroidery-specific carbon—regular sewing carbon often leaves permanent stains.
- Press lightly—heavy tracing pushes pigment too deep into the fabric.
- Tape all layers down to prevent shifting (shifting = smudges!).
4. Tracing Over a Light Source: Perfect for Sheer Fabrics
For delicate fabrics like silk or organza, tracing over a light source is a low-tech, gentle method. Here’s how: tape your pattern to a lightbox (or a bright window), lay sheer fabric over it, then trace with a water-soluble pen.

- Fabric must be sheer—opaque fabrics block the light, making tracing impossible.
- Stabilize fabric with tape to avoid shifting while you trace.
- Daylight from a window provides the clearest view of your pattern.
5. Water-Soluble Stabilizer: Precision for Complex Designs
Water-soluble stabilizer for embroidery is a game-changer for detailed designs (think mandalas or tiny florals) or stretchy fabrics like knits. Here’s how to use it: print your design directly onto the stabilizer with a laser or inkjet printer, hoop the stabilizer with your fabric, stitch through both, then rinse away the stabilizer when done.

- Use water-soluble stabilizer—regular paper won’t dissolve.
- Laser printers are more reliable than inkjets (inkjet ink may smudge unless heat-set first).
- Check your printer can handle the stabilizer’s thickness.
6. Prick-and-Pounce: Traditional Charm for Heirlooms
The prick and pounce embroidery technique is a classic, chemical-free method, perfect for heirloom projects or framed art. Steps:
- Prick tiny holes along your pattern’s lines with a needle.
- Lay the paper on fabric, then dab a pounce pad (filled with embroidery powder) over the holes—powder marks the outline.
- Trace over the powder with a pen to clarify lines.

- Use fine embroidery powder (like talc) to avoid staining.
- Practice pricking evenly—too many holes cause smudges.
- Best for non-washable items, as powder fades when wet.
7. Transfer Paper (Tracing Paper) Method: Low-Cost Simplicity
- Prepare Your Design: Use a hand-drawn sketch, printed template, or even a phone screenshot as your base.
- Trace Onto Transfer Paper: Lay the transfer paper over your design. With a water-soluble pen, trace the lines—you’ll see the design through the thin paper.
- Transfer to Fabric: Lay the traced transfer paper over your embroidery fabric. Trace the lines again with the water-soluble pen; the ink soaks through the paper onto the fabric.
- Stitch & Wash: The blue pen lines are temporary—rinse them away when you’re done stitching!

Pros:
- Ultra-affordable: Tracing paper costs just a few dollars, and water-soluble pens are widely available.
- No special tools needed: No printers, irons, or carbon paper—just pen and paper.
- Perfect for small, simple designs: Great for beginners practicing basic motifs (like the tiger in the demo!).
Tips for Success
- Secure all layers: Tape the transfer paper to your design and to the fabric to prevent shifting (shifting = crooked lines!).
- Use fresh pen ink: Dried-out pens won’t transfer well. Test on a scrap first!
- Limit to light/medium fabrics: Dark fabrics make the blue lines hard to see. For dark cloth, pair with a lightbox to trace more clearly.
- Handle with care: Tracing paper tears easily, so work slowly when lifting it from fabric.
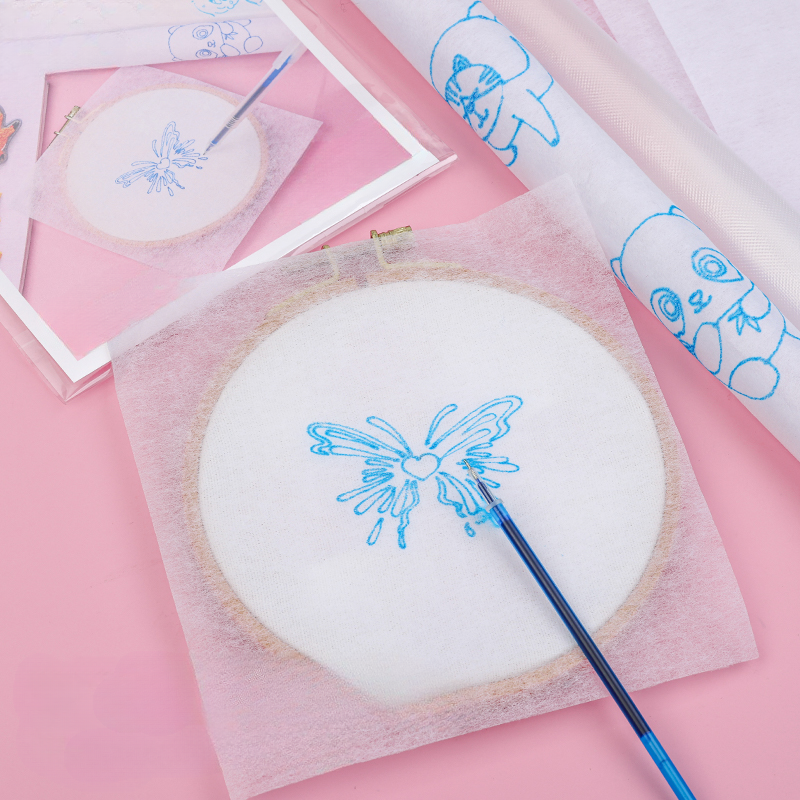
8. Water-Soluble Stabilizer Film: Draw-and-Stitch Precision

Pros:
- You draw on it just once and can stitch right through, no need for double tracing.
- It excels at stabilizing stretchy fabrics like knits and T - shirts, keeping them taut and preventing puckering.
- Unlike water - soluble paper, it dissolves entirely in cool water (15–30℃) within minutes, leaving absolutely no residue.